 | ||||||||||||||||||
 | ||||||||||||||||||
|
||||||||||||||||||
 | ||||||||||||||||||
| Tutorials: 24:7 Archive Recording - for Loop Recorder Pro | Thursday, July 23, 2026 |
Step I: Specify the folder, file names and audio format
 A) Create a folder for the audio files
for example c:\AudioArchive
B) Start Loop Recorder Pro
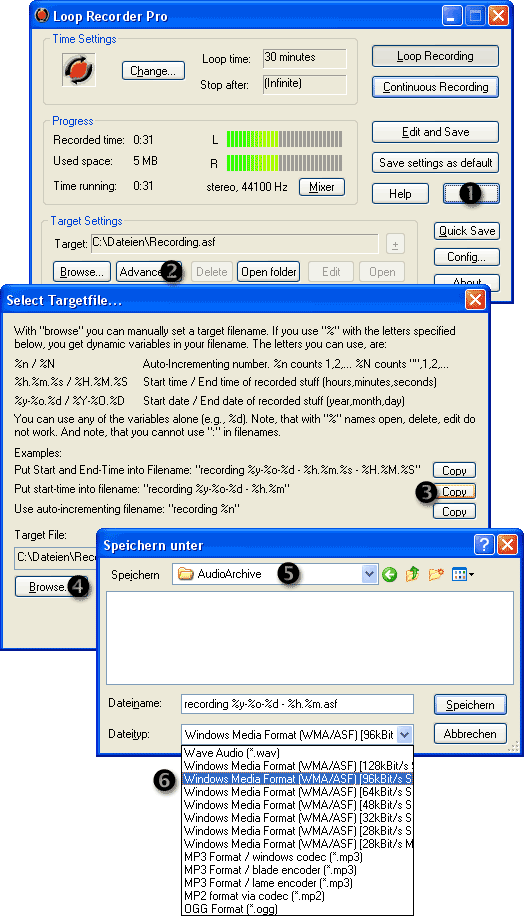
First you should click the Mixer button and select the source (Line in) and level while watching the LEDs.
- Click the button
 >> for the extended view.
 - Click
 Advanced....
 - Pick one of the file name templates by clicking the
 Copy button.
 - Click
 Browse....
 - Search the folder
 c:\AudioArchive.
 - Select an audio format, for example
 Windows Media Format (ASF) 96kBit/s.
 - Click Save and then Ok.
Continue with Step II >>
Step II: Set up the archive mode
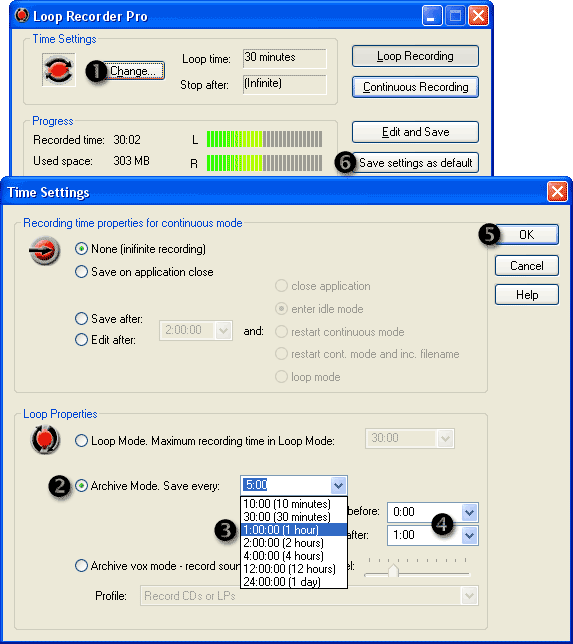
- Click the button Change...
- In Loop Properties select Archive Mode.
- Select one of the saving intervals, for example 1:00:00 (1 hour)*.
- Select apropriate overlapping durations.
- Click Ok.
- In the main window click Save settings as default.
*) The saving interval alignes to the clock. The effective overlapping is the sum of both overlapping values.
In this example the recorded files cover:
- 1st file: from 09:00 to 10:01
- 2nd file: from 10:00 to 11:01
- 3rd file: from 11:00 to 12:01 etc.
Continue with Step III >>
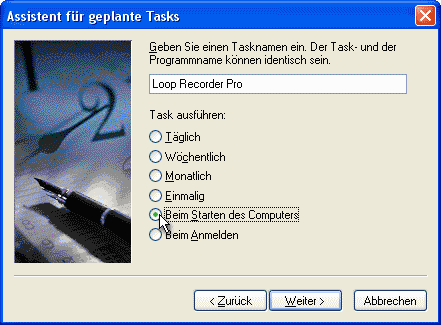
Step III: Go sure that Loop Recorder Pro runs permanently
Either:
- Create a Loop Recorder Pro shortcut to the StartUp group of the Start Menu, or better:
- Add a task in the task scheduler that runs Loop Recorder Pro at system startup. Please go sure that Loop Recorder Pro runs under your account (your user name), so that your settings will take effect.
Back to the tutorial index
Multiple sound cards: How to archive 3 audio sources at the same time?
- Create 3 folders, for example:
- c:\AudioArchive\Program1
- c:\AudioArchive\Program2
- c:\AudioArchive\Program3
- Set up 3 Loop Recorder Pro shortcuts in the StartUp group of your Start Menu or add 3 tasks in the task scheduler and modify the command lines as follows:
- LoopRecP.exe -S:1 -f:"c:\AudioArchive\Program1\recording %y-%o-%d - %h.%m.asf"
- LoopRecP.exe -S:2 -f:"c:\AudioArchive\Program2\recording %y-%o-%d - %h.%m.asf"
- LoopRecP.exe -S:3 -f:"c:\AudioArchive\Program3\recording %y-%o-%d - %h.%m.asf"
The -S: switch specifies the sound card number. The -f: switch changes the file path.
Back to the tutorial index
© 1999 – 2026 Thomas Riechmann, Gerald Riechmann, all rights reserved.